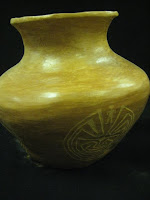
All students have completed the burnishing of their pots. The burnishing process, working in a 50 minute class period, took almost two weeks. They have been fired to the low temperature of cone 018, which is approximately between 500 and 600 degrees, in my kilns at school. We used Lizella clay which is an earthenware clay and fires orange in color.
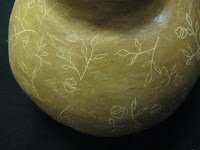
The photos below are of my students' work. Lizella clay is used which fires to an orange color and is an earthenware clay.Slip, which is a clay and water mixture, can be used to apply decoration to the pot or designs can be  incised or sc
 ratched into the clay.
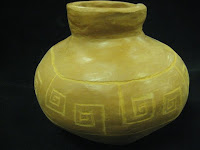


This is a close up of a pot before it is fired and then after it has been fired. Notice the orange color.
 incised or sc
 ratched into the clay.


This is a close up of a pot before it is fired and then after it has been fired. Notice the orange color.
 It is hard to see but there is a shiny glossy look to the pots due to the burnishing. The clay body looks like it has been glazed but has not.
The final step now is to pit fire them. My student teacher loaded them today to take home. Unfortunately, rain is in the forecast for most of the weekend so we will have to wait to fire them. The finished products will be posted later. They will be black instead of orange.


The orange finish is absolutely beautiful, so I am anxious to see what the final black finish looks like . . . it is hard to believe it could be any more attractive.
ReplyDeleteIt's nice seeing your student's work. Doesn't it make you feel like you have accomplished something at the end of the day, when you see their work progressing?
ReplyDeleteHi Sue,
ReplyDeleteYes, some students even asked if they could leave it the orange color. We knew Lizella fires orange but this orange color at a lower temperature is much deeper, more rust than orange.
Hi Sharon,
ReplyDeleteIn reading your comment on my blog, yes, it is very rewarding to see them so excited about their work and also the ones that are above average. Now that is not saying all are extremely excited but most do enjoy it.
I love the look of this pottery. This something I would love to have in my own house. The small etching on the pots are very artistic, but also rustic is some ways. They are amazing!
ReplyDeleteMy favorite design is the one with the leaves. It's a really nice design to use to cover the the entire pot. The design is so intricate that it must've taken awhile to get all of it done.
ReplyDeleteBy providing the photographs for us we are able to more fully appreciate the students work. Thank your for showing us the pottery making process and allowing us to "peek" into your classroom.
ReplyDelete